Accessing Actian Zen with Its Java Class Library
In this tutorial, we will learn how to connect to the Actian Zen database using the Java Class Library (JCL).
This page covers the topics listed at right.
What Is the Java Class Library?
The Java Class Library (JCL) interface is an object-oriented way of interacting with the Actian Zen database at a lower level than a traditional SQL interface.
The advantages of using the JCL for application development with Actian Zen include:
- Native language syntax for working with the database
- NoSQL-style database access paradigms
- Easy database integration into your application in a variety of languages
Setting Up the JCL
To use the JCL, the .jar file and platform-specific libraries must be downloaded and the system CLASSPATH modified to make the .jar file available to the project.
To use the JCL in a project, we need to:
- Install Actian Zen.
- Ensure a recent version of the Java Development Kit (JDK) is installed on your system.
- Download and unpack the Java Class Library for your development environment.
- Add the JCL .jar file to the CLASSPATH environment variable on your system.
- Create a Java application.
The JCL is a standard Java class library, so it integrates with the rest of your application just like any other library.
JCL Setup on Windows
Download and unzip the JCL Windows SDK for Zen v14.
Downloads require an Actian ID, so make sure to log in or register an Actian ID before starting the download.
Go to the Actian Electronic Software Distribution page.
Select the package to download by choosing the following in the menus:
- Product: Actian Zen (PSQL)
- Release: SDKs
- Platform: Java Class Library
Expand the Java Class Library link and scroll to JCL Windows SDK in the list, then click the HTTP button to download the self-extracting archive.
Note: If a Windows Defender SmartScreen dialog appears, click More info, then Run anyway.
Extract the SDK files to a local directory. You’ll find the jnibtrv.dll and psql.jar files in the \bin directory under Zen-SDK-JCL-Windows.
Add the \bin directory where the files were saved to the PATH environment variable.
Add the full path to psql.jar to the CLASSPATH environment variable.
JCL Setup on Linux
The Linux version of Actian Zen Enterprise Server includes the JCL. It doesn’t need to be downloaded separately on Linux. However, you must include the .jar files in the CLASSPATH environment variable.
If you need to install the JCL in a development environment that will not have an Actian Zen database installation, download JCL Linux SDK for Zen v14 from the Actian Electronic Software Distribution page. Downloads require an Actian ID, so make sure to log in or register an Actian ID before starting the download.
Select the package to download by choosing the following in the menus:
- Product: Actian Zen (PSQL)
- Release: SDKs
- Platform: Java Class Library
Expand the Java Class Library link and scroll to JCL Linux SDK, then click the HTTP button to download the tar.gz file.
Extract the files in the download to your local system, such as /usr/local.
To use the JCL, the CLASSPATH environment variable must be updated with the path to the .jar files, which can be found in /usr/local/psql/lib:
- jpscs.jar
- psql.jar
Open a terminal. From within the terminal open the ~/.bash_profile for the current user account in an editor. For example:
nano ~/.bash_profile
The CLASSPATH must be updated to include the paths to the JCL .jar files. Update the entry so that it looks like the following. The JDK version number may differ on your system.
export
CLASSPATH=".:/opt/jdk/jdk-12.0.2/lib:/usr/local/psql/lib/jpscs.jar:/usr/local/psql/lib/ppsql.jar"
Update the environment by either running the source command or logging out and back in.
Using the JCL
In this tutorial, we will learn how to connect to the Actian Zen database using the Java Class Library (JCL) APIs. The classes needed to connect to a database are found in the package pervasive.database.
To connect to the database, we need to define a connection string. The first part of the connection string, which is the protocol, is:
btrv:///
For a database with no password, the name of the database will be the next part of the string. For example, Actian Zen installs with a demonstration database named Demodata. To use this database, the connection string would be:
btrv:///demodata
Note that, in the connection string, the database name is not case-sensitive.
To connect to the database, we first create a new session by calling Driver.establishSession(), which returns a Session object. Then, connect to a named database by calling Session.connectToDatabase(), passing in the connection string:
Session session = Driver.establishSession();
Database db = session.connectToDatabase("btrv:///demodata");
If the connection is successful, it will return a Database object that can be used to access the database tables. If there’s a problem connecting, an exception will be thrown with information about the problem, such as the wrong name for the database.
In the following code, we attempt to connect to the database and print a message indicating whether the attempt was successful.
import pervasive.database.*;
public class JCLConnect {
  public static void main(String[] args) {
    try {
      Session session = Driver.establishSession();
      Database db = session.connectToDatabase("btrv:///demodata");
      System.out.println(
          "Successfully connected to: " + db.getDataPath());
      //
      // Other actions to interact with
      // the database would go here
      //
    } catch (PsqlException exc) {
      System.err.println("Problem connecting to the database.");
      exc.printStackTrace();
    }
  }
}
The Database object is used to retrieve tables, which can then be used to create, retrieve, update, and delete rows in that table. We’ll look at creating data in the next section.
For more details on the JCL APIs, see Programming with the Java Class Library.
Creating Data with Java and the JCL
In this section, we’ll learn to use the Java Class Library (JCL) with an Actian Zen database.
Since databases and tables can’t be created directly using JCL, we’ll use Zen Control Center to create a new database, and then create a table in that database. We’ll then use the JCL to insert data (rows) into that table.
- Creating a Database in Zen Control Center
- Creating a Table with Zen Control Center
- Inserting Rows in a Table Using JCL
Creating a Database in Zen Control Center
The JCL does not support the creation of databases and tables. Instead, use Zen Control Center to perform these tasks. Once the database and table structures have been created in Zen Control Center, we will use the JCL to manipulate the data.
For the rest of this tutorial, we’ll use a new database called “ZENJCLDB”.
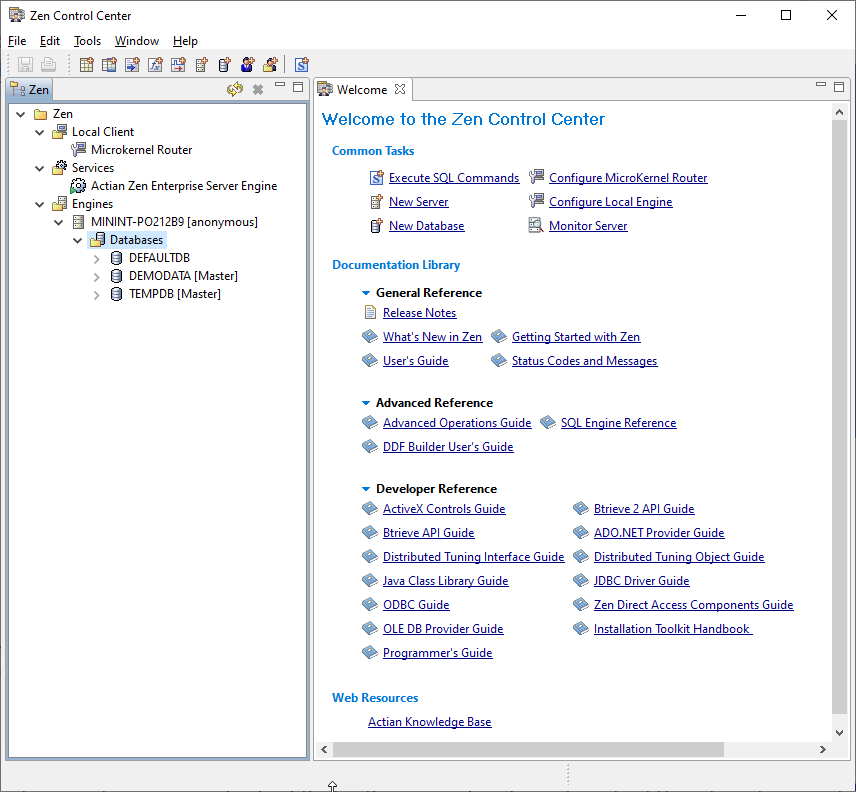
Launch Zen Control Center, and you’ll see this screen:
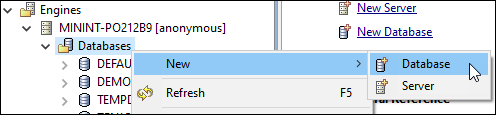
Under the Engines tree node, right-click the Databases > New > Database, as shown here:
Name the new database ZENJCLDB and choose an appropriate location for the database (we’ll use C:\actian\databases in the examples). Leave the default settings for the rest of the options.
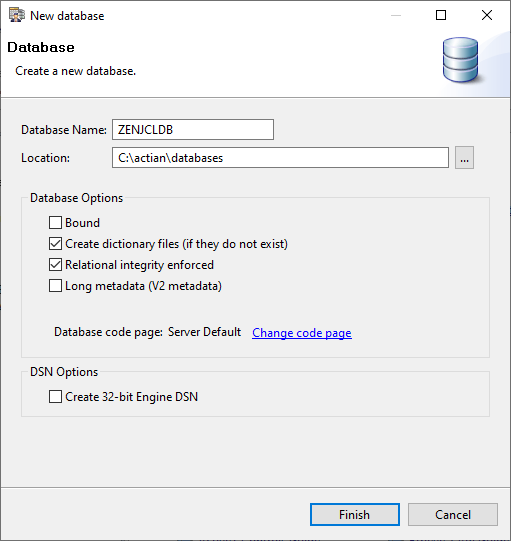
When you click Finish, Zen Control Center creates the database files.
Creating a Table with Zen Control Center
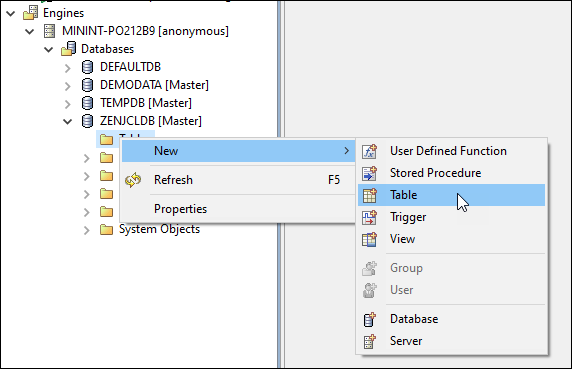
Since we can’t use JCL to create tables directly, we’ll again use Zen Control Center to create a table in the ZENJCLDB database.
Under the ZENJCLDB node in the tree, right-click Tables > New > Table to add a new table to this database.
For the table name, we’ll use Course.
Note that table, column, and other names are case-sensitive when accessing the database via the JCL, so keep that in mind when naming things.
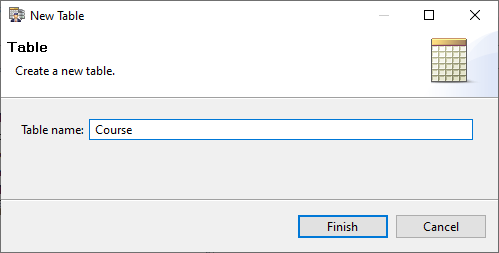
Click Finish. Zen Control Center displays a Column Editor pane that we’ll use to create and configure columns for the Course table.

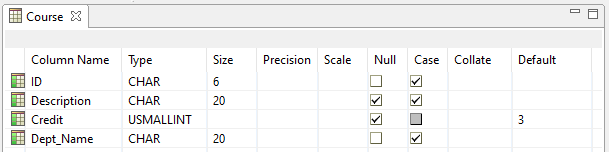
We’ll create four columns for this table as follows. The following table lists the four columns and their attributes. Make sure the cases of the column names are correct.
|
Column Name |
Type |
Size |
Null |
Case |
Default |
| ID |
CHAR |
6 |
No Nulls (unchecked) |
Case insensitive (checked) |
None |
| Description |
CHAR |
20 |
Null OK (checked) |
Case insensitive (checked) |
None |
| Credit |
USMALLINT |
(leave blank) |
Null OK (checked) |
Not applicable |
3 |
| Dept_Name |
CHAR |
20 |
No Nulls (unchecked) |
Case insensitive (checked) |
None |
Save the changes we made to the table by selecting File > Save. Once you’re finished creating the columns, the table should look like this:
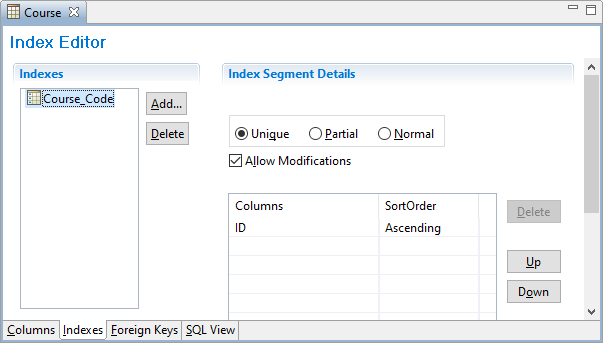
Now let’s add an index for the table:
- Click the Indexes tab at the bottom of the window.
- Click the Add button.
- Select Course_Code for the index name and click OK.
- Under the Index Segment Details, select Unique.
- Make sure that ID is in the Columns list with the SortOrder as Ascending.
When you’re finished, it should look like this:
Save the changes we made to the table by selecting File > Save.
You can also create rows in the table using Zen Control Center, but we’ll focus on working with rows programmatically using the JCL.
Inserting Rows in a Table Using JCL
Let’s write a simple Java program to add a new row to the Course table that we just created.
Open a command prompt or terminal and change to a directory where we can create our Java source files. For these steps, we’ll put the code in C:\actian\jcl.
Using a text editor or Java development environment, create a file called JCLCreate.java and copy the following code into it:
import pervasive.database.*;

public class JCLCreate {

  public static void main(String[] args) {

    try {
      Session session = Driver.establishSession();

      // The database name is case-insensitive
      Database db = session.connectToDatabase("btrv:///zenjcldb");

      // Retrieve the Course table object,
      // the table name here is case-sensitive
      Table table = db.getTable("Course");

      RowSet rowset = table.createRowSet();

      // We’ll create a new row to insert into the table
      Row row = rowset.createRow();

      // Insert data into the row by setting each column value separately
      row.setString(0, "PHY203"); // we can specify the column by number
      row.setString("Description", "Thermodynamics"); // or by column name
      row.setInt("Credit", 5); // column names are case-sensitive
      row.setString(3, "Physics"); // column numbers are 0-based

      // Insert the Row object to the table
      rowset.insertRow(row);

      System.out.println("New course added.");
    } catch (PsqlException e) {
      e.printStackTrace();
    }
    System.out.println("Creation completed.");
  }
}
Let’s walk through this code to understand what it’s doing.
- First, we import the JCL package, pervasive.database:
import pervasive.database.*;
- Next, we establish a session using the Driver class that represents the connection to the underlying driver and obtain a Session object so we can connect to the database:
Session session = Driver.establishSession();
- Now we connect to our database using the connectToDatabase() method, passing in the connection string btrv:///zenjcldb as the argument, and we get a Database object:
Database db = session.connectToDatabase("btrv:///zenjcldb"); - We get the Course table object from the database using the getTable() method:
Table table = db.getTable("Course"); - With the Table object, we get the RowSet by calling createRowSet(), which creates a representation (a virtual table) of the data that is physically stored on disk:
RowSet rowset = table.createRowSet();
The RowSet object provides methods for inserting, updating, and deleting the rows in the table.
- To insert a new row, we first create an empty row by calling the RowSet object’s createRow() method:
Row row = rowset.createRow();
A Row object provides methods to get or set column values within the row.
- To fill data into the row, we’ll set values for each column using the Row object’s setDataType() methods (setInt(), setString(), and so on). The first parameter to the set method is the column, which can be either the (zero-based) column number, or the (case-sensitive) column name. The second parameter is the data itself. Here we use both mechanisms:
// Insert data into the row by setting each column value separately row.setString(0, "PHY203"); // we can specify the column by number row.setString("Description", "Thermodynamics"); // or by column name row.setInt("Credit", 5); // column names are case-sensitive row.setString(3, "Physics"); // column numbers are 0-based - To insert this new row into the Course table, we call the RowSet object’s insertRow() method with the Row object:
rowset.insertRow(row);
Now let’s compile and run this code.
Compile with:
javac JCLCreate.java
And then run it with:
java JCLCreate
If all goes well, you’ll see:
New course added.
Creation completed.
If something went wrong, you’ll see a stack trace.
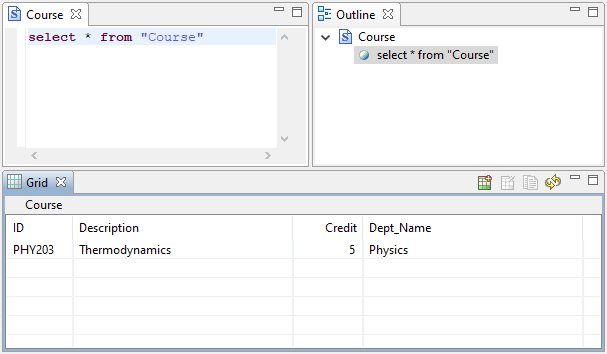
To check that the new row was inserted, go to Zen Control Center and double-click the Course table in the tree. You should see the new course row appear as shown:
Congratulations, you have successfully inserted data into an Actian Zen database using Java code.
This program, saved in a file called JCLInsert.java, will insert more data for us to use with the rest of this tutorial:
import pervasive.database.*;

public class JCLInsert {

  public static void main(String[] args) {

    try {
      Session session = Driver.establishSession();

      Database db = session.connectToDatabase("btrv:///zenjcldb");

      Table table = db.getTable("Course");

      RowSet rowset = table.createRowSet();

      insertRow(rowset, "CSC101", "Intro to Computing", 5, "Computer Science");
      insertRow(rowset, "CSC102", "Intro to Programming", 3, "Computer Science");
      insertRow(rowset, "CSC203", "Prog Concepts I", 3, "Computer Science");
      insertRow(rowset, "CSC204", "Prog Concepts II", 3, "Computer Science");
      insertRow(rowset, "CSC305", "Prog Languages", 3, "Computer Science");
      insertRow(rowset, "MAT101", "College Algebra", 3, "Mathematics");
      insertRow(rowset, "MAT102", "Pre-Calculus", 3, "Mathematics");
      insertRow(rowset, "MAT203", "Calculus I", 4, "Mathematics");
      insertRow(rowset, "MAT204", "Calculus II", 4, "Mathematics");
      insertRow(rowset, "PHY102", "Physical Science", 3, "Physics");
      insertRow(rowset, "PHY204", "Physics II", 3, "Physics");
      insertRow(rowset, "PHY305", "Electromagnetism I", 3, "Physics");
      insertRow(rowset, "PHY306", "Electronics II", 3, "Physics");

      System.out.println("New courses added.");
    } catch (PsqlException e) {
      e.printStackTrace();
    }
  }

  private static void insertRow(
      RowSet rowset, String id, String description,
      int credit, String dept) throws PsqlException {

    Row row = rowset.createRow();

    row.setString("ID", id);
    row.setString("Description", description);
    row.setInt("Credit", credit);
    row.setString("Dept_Name", dept);

    rowset.insertRow(row);
  }
}
Reading Data with Java and the JCL
In this section, we’ll learn how to perform basic queries using the Java Class Library (JCL). These cover the Read part of the standard CRUD database operations.
- Retrieving Rows with RowSet
- Reading the Row Data
- Retrieving All Rows
- Retrieving a Subset of Rows
- A Full Example to Retrieve Rows
- Changing the Direction of Iteration
- Retrieving a Specific Row Using an Index
Retrieving Rows with RowSet
The RowSet object provides a getNext() method for iterating through the rows in the row set and returning each one as a Row object. Each row set instance keeps its own record of where it is in the iteration by an internal “currency” (or “cursor”), which, when first created, points to just before the first row when the row set is created. So in the following example, the row retrieved is the first one in the table, if there are any rows:
try {
  // code to connect to the database and
  // get the table would go here

  RowSet rowset = table.createRowSet();
  // the currency now points to just before the first row

  // getNext gets the next row, which is the first one
  Row row = rowset.getNext();

  //
  // now we can read columns from this row
  //
} catch(PsqlEOFException ex) {
  // This exception is thrown if we’re past the last row
  System.out.println("End of table reached.");
} catch (PsqlException e) {
  // catch any other problems
  e.printStackTrace();
}
If there were no rows, or the currency was at the end of the row set, then the getNext() call would cause a PsqlEOFException to be thrown, which is why we need to make sure to catch it.
Reading the Row Data
Now that we can get a row, we can read the contents of the row, column by column, using methods similar to the ones used to write data to a row.
We use the Row object’s getDataType() methods, such as getInt() to get a column’s int value, getString() to get a String value, and so on. When calling these methods, we provide either the column number (zero-based) or the case-sensitive column name:
// Get column value by column number
String id = row.getString(0);
String description = row.getString(1);

// Can also get column value by column name
int credit = row.getInt("Credit");
String deptName = row.getString("Dept_Name");
Retrieving All Rows
To retrieve all the rows in a table, we continually call the RowSet object’s getNext() method inside of a loop until the PsqlEOFException is thrown, which tells us that the end of the set of rows has been reached. This code displays the contents of each record.
try {

  // code to connect to the database and
  // get the table would go here

  RowSet rowset = table.createRowSet();
  // the currency points to just before the first row

  // now we can loop from the first row to the last
  while (true) {
    Row row = rowset.getNext();
    // get the Description column value and display it
    String description = row.getString("Description");
    System.out.println(description);
  }
} catch(PsqlEOFException e) {
  System.out.println("End of table reached.");
}
Retrieving a Subset of Rows
To retrieve a subset of the rows in a table, say, only those courses offered by the Mathematics department, we need to provide the criteria for selecting this subset of rows.
Since we want the subset of rows to be where the Dept_Name column data is equal to Mathematics, we need to get an object representing that column, which we get from the row set metadata.
First, we get the metadata:
RowSetMetaData rsmd = rowset.getRowSetMetaData();
Then we get the ColumnDef object by supplying the column name or zero-based index, just like we did to get the column’s value. To get the ColumnDef for the Dept_Name, we do this:
ColumnDef columnDef = rsmd.getColumnDef(3);
We could also get the ColumnDef by using the name:
ColumnDef columnDef = rsmd.getColumnDef("Dept_Name");
Next, we add criteria for the subset by adding terms, which consist of a ColumnDef object, a comparison operator, and the value of the filter expression. For example, we add the first term to the RowSetMetaData like so:
rsmd.addFirstTerm(columnDef, Consts.BTR_EQ, "Mathematics");
The JCL provides a number of comparison operators as follows:
- BTR_EQ for equal to
- BTR_NOT_EQ for not equal to
- BTR_GR for greater than
- BTR_GR_OR_EQ for greater than or equal to
- BTR_LESS for less than
- BTR_LESS_OR_EQ for less than or equal to
You can add additional criteria to the first one, to further refine the subset of rows, by calling the RowSetMetaData object’s addOrTerm() or addAndTerm() method. They also accept the ColumnDef object, a comparison operator, and the value of the filtering column.
For example, to also allow rows where the Dept_Name is Physics, we’d do:
rsmd.addOrTerm(columnDef, Consts.BTR_EQ, "Physics");
As the names suggested, addOrTerm() specifies the logical relationship OR, whereas addAndTerm() is the logical relationship AND. These combine with the previously defined selection criteria.
Now if we iterate through the row set, we’d only get rows where the Dept_Name is Physics or Mathematics.
A Full Example to Retrieve Rows
Let’s put it all together in a Java program that gets information about the list of courses offered by Mathematics or Physics departments from the Course table of the ZENJCLDB database.
Create a new file, JCLRead.java, and copy the code below, which we’ve already seen that connects to our database (ZENJCLDB), gets the table (Course), and creates a RowSet object from the table:
import pervasive.database.*;
public class JCLRead {
  public static void main(String[] args) {
    try {
      Session session = Driver.establishSession();
      Database db = session.connectToDatabase("btrv:///zenjcldb");
      Table table = db.getTable("Course");
      RowSet rowset = table.createRowSet();
      searchForMathOrPhysics(rowset);
      System.out.println("Courses by Mathematics or Physics departments");
      System.out.println("=============================================");
      displayRows(rowset);
    } catch (PsqlException e) {
      e.printStackTrace();
    }
  }

  public static void searchForMathOrPhysics(RowSet rowset) {
    // to be implemented
  }

  public static void displayRows(RowSet rowset) throws PsqlException {
    // to be implemented
  }
}
Next, we’ll implement the searchForMathOrPhysics() method to restrict the RowSet to only rows where the Dept_Name column is Mathematics or Physics using the BTR_EQ comparison operator combined with an OR term:
public static void searchForMathOrPhysics(RowSet rowset) {
    RowSetMetaData rsmd = rowset.getRowSetMetaData();
    ColumnDef deptNameColDef = rsmd.getColumnDef("Dept_Name");
    // Search for where the column equals Mathematics
    rsmd.addFirstTerm(deptNameColDef, Consts.BTR_EQ, "Mathematics");
    // Or the column equals Physics
    rsmd.addOrTerm(deptNameColDef, Consts.BTR_EQ, "Physics");
    // Set the row set’s current row (currency) to before the first row
    rowset.reset();
}
Then we’ll implement code to display all rows from the current row set, which is now constrained to only contain rows matching the terms we specified above:
public static void displayRows(RowSet rowset) throws PsqlException {
  try {
    while (true) {
      Row row = rowset.getNext();
      String name = row.getString(0);
      String desc = row.getString("Description");
      int credit = row.getInt(2);
      String deptName = row.getString("Dept_Name");
      System.out.println(name + " " + credit + " "
          + deptName + "\t" + desc);
    }
  } catch (PsqlEOFException e) {
    System.out.println("-------------");
    System.out.println("End of table.");
  }
}
If we compile the complete code and run JCLRead.java, we’ll see this output:
Courses by Mathematics or Physics departments
=============================================
MAT101 3 Mathematics  College Algebra
MAT102 3 Mathematics  Pre-Calculus
MAT203 4 Mathematics  Calculus I
MAT204 4 Mathematics  Calculus II
PHY102 3 Physics Physical Science
PHY203 5 Physics Thermodynamics
PHY204 3 Physics Physics II
PHY305 3 Physics Electromagnetism I
PHY306 3 Physics Electronics II
-------------
End of table.
Changing the Direction of Iteration
By default, the getNext() method returns the next row in the row set object in a forward direction. You can iterate in reverse order by calling the RowSetMetaData object’s setDirection() method using Const.BTR_BACKWARDS as the argument:
RowSetMetaData rsmd = rowset.getRowSetMetaData();
rsmd.setDirection(Const.BTR_BACKWARDS);
To switch back to the forward direction, use Const.BTR_FORWARDS:
rsmd.setDirection(Const.BTR_FORWARDS);
We can combine the direction with the RowSet reset() method to jump to the first row or to the last.
To retrieve the first row, we set the retrieval direction forwards, then set the current row position to before the first row with the reset() method and get the next (first) row:
rsmd.setDirection(Const.BTR_FORWARDS);
rowset.reset();
Row firstRow = rowset.getNext();
To retrieve the last row in a row set, we set the retrieval direction backwards, then reset() the row set and do a getNext(). Since the direction is backwards, reset goes to the end of the available rows, ready to iterate backwards.
For example, this will retrieve the last row of the row set:
rsmd.setDirection(Const.BTR_BACKWARDS);
rowset.reset();
Row lastRow = rowset.getNext();
Retrieving a Specific Row Using an Index
You can retrieve a particular row using its uniquely indexed column along with a comparison operator. For example, to retrieve a course row where the ID is PHY203, we use the unique index Course_Code that we created based on the ID column, along with the equals comparison operator.
First, we set the access path to the desired index, either a zero-based number or the name of the index. Then we get the index column and set the string to be the value we’re looking for. Finally, we get our row with the RowSet getByIndex() method.
We use the RowSetMetaData to set the access path:
RowSetMetaData rsmd = rowset.getRowSetMetaData();
rsmd.setAccessPath("Course_Code");
// could also use the column index: rsmd.setAccessPath(0);
Then we get the Index object representing the Course_Code index:
Index index = rowset.createIndex("Course_Code");
// can also use the zero-based number: Index index = rowset.createIndex(0);
Next we use the setString() method on the Index object to set the name of the column (not the name of the index) and the data we’re looking for:
index.setString("ID", "PHY203");
// can also use the column number: index.setString(0, "PHY203");
Finally, we get the desired row (where ID equals PHY203) by calling the RowSet object’s getByIndex() method with a comparison operator and the Index object. Note that if a matching row can’t be found, PsqlOperationException will be thrown where the error code is 4, indicating not found. If the error code isn’t 4, then some other problem occurred.
try {
  Row row = rowset.getByIndex(Consts.BTR_EQ, index);
  // now we have the matching row
} catch (PsqlOperationException e) {
  if (e.getErrorCode() == 4) {
    System.out.println("Matching row was not found");
  } else {
    throw(e);
  }
}
The full working code example is as follows:
import pervasive.database.*;
public class JCLReadByIndex {
  public static void main(String[] args) {
    try {
      Session session = Driver.establishSession();
      Database db = session.connectToDatabase("btrv:///zenjcldb");
      Table table = db.getTable("Course");
      RowSet rowset = table.createRowSet();
      RowSetMetaData rsmd = rowset.getRowSetMetaData();
      // set the access path to be through the index "Course_Code"
      rsmd.setAccessPath("Course_Code");
      // get the index object so we can set the ID to the
      // one we're looking for
      Index index = rowset.createIndex("Course_Code");
      index.setString("ID", "PHY203");
      System.out.println("Courses with Course Code of PHY203");
      System.out.println("==================================");
      // look for the matching row
      try {
        Row row = rowset.getByIndex(Consts.BTR_EQ, index);
        // now we have the matching row, so display it
        // otherwise if we didn't find it, an exception will be thrown
        String name = row.getString(0);
        String desc = row.getString("Description");
        int credit = row.getInt(2);
        String deptName = row.getString("Dept_Name");
        System.out.println(name + " " + credit + " "
            + deptName + "\t " + desc);
      } catch (PsqlOperationException e) {
        if (e.getErrorCode() == 4) {
          System.out.println("Matching row was not found");
        } else {
          throw(e);
        }
      }
    } catch (PsqlException e) {
      e.printStackTrace();
    }
  }
}
And when you run this code, you’ll see:
Courses with Course Code of PHY203
==================================
PHY203 5 Physics  Thermodynamics
If you changed the code above to look for a nonexistent ID (for example, “ACC201”), you would see:
Courses with Course Code of ACC201
==================================
Matching row was not found
Updating Data with Java and the JCL
In this section, we’ll learn how to perform the Update part of the CRUD database operations using the Java Class Library (JCL):
- Modifying Rows
- Modifying a Specific Row
- Writing a Program to Update Rows
JCL does not support operations to modify databases or tables. For that, you must use Zen Control Center. You can also use Zen Control Center to modify rows in the table, but here we will look only at using JCL to make modifications.
Modifying Rows
To modify a set of rows, retrieve the set of rows to be modified, then use the same setDataType() methods as previously used when creating rows, and finish by using the row set’s updateRow() method. In this example we’ll modify rows of courses offered by the Mathematics department.
We’ll start by following the steps described previously in the topic Retrieving a Subset of Rows to create a RowSet object containing the desired rows.
We’ll then iterate through rows, retrieve each row, and update the Credit column by setting its value to 5, like so:
row.setInt("Credit", 5);
We then tell the RowSet to store the updated row by passing it to updateRow():
rowset.updateRow(row);
The entire code snippet for modifying a subset of rows is shown below:
try {
  while (true) {
    // code to get subset of rows into rowset
    Row row = rowset.getNext();
    row.setInt("Credit", 5);
    rowset.updateRow(row);
  }
} catch (PsqlEOFException e) {
  System.out.println("End of update.");
}
Modifying a Specific Row
To modify a particular row, say in response to a request by the Physics department to change the credit of the course with ID of PHY203 from 5 to 3, start by retrieving that particular row by as described in Retrieving a Specific Row Using an Index, then modifying it in the same way as above:
try {
  Row row = rowset.getByIndex(Consts.BTR_EQ, index);
  row.setInt("Credit", 3);
  rowset.updateRow(row);
} catch (PsqlOperationException e) {
  if (e.getErrorCode() == 4) {
    System.out.println("Matching row not found.");
  } else {
    throw(e);
  }
}
Writing a Program to Update Rows
The full code to do an update for a specific row is below. You can save this program as JCLUpdate.java.
import pervasive.database.*;

public class JCLUpdate {

  public static void main(String[] args) {
    try {
      Session session = Driver.establishSession();
      Database db = session.connectToDatabase("btrv:///zenjcldb");
      Table table = db.getTable("Course");
      RowSet rowset = table.createRowSet();
      Row row = rowForPhysics203(rowset);
      if (row != null) {
        // Update column data
        row.setInt("Credit", 3);
        rowset.updateRow(row);
        System.out.println("Row updated.");
      }
    } catch (PsqlException e) {
      e.printStackTrace();
    }
  }

  private static Row rowForPhysics203(RowSet rowset) throws PsqlException {
    try {
      RowSetMetaData rsmd = rowset.getRowSetMetaData();
      // Set the access path to access rows by an index
      rsmd.setAccessPath("Course_Code");
      Index index = rowset.createIndex("Course_Code");
      // Pass the column and our search value
      index.setString("ID", "PHY203");

      // Return a Row object that meets the criterion
      return rowset.getByIndex(Consts.BTR_EQ, index);
    } catch (PsqlOperationException e) {
      if (e.getErrorCode() == 4) {
        System.out.println("Row not found!");
        return null;
      } else {
        throw(e);
      }
    }
  }
}
Compile and run JCLUpdate.java.
To verify that the row has been modified successfully, you can look at the data in Zen Control Center, or run the JCLRead.java program and note that the credit for course PHY203 is now 3 (before it was 5).
The output from running JCLRead.java after JCLUpdate.java would look like the following. Note the changed row in bold text:
Courses by Mathematics or Physics departments
=============================================
MAT101 3 Mathematics     College Algebra
MAT102 3 Mathematics     Pre-Calculus
MAT203 4 Mathematics     Calculus I
MAT204 4 Mathematics     Calculus II
PHY102 3 Physics             Physical Science
PHY203 3 Physics          Thermodynamics
PHY204 3 Physics             Physics II
PHY305 3 Physics             Electromagnetism I
PHY306 3 Physics             Electronics II
-------------
End of table.
You have successfully created a Java program to modify a specific row in an Actian Zen database.
Deleting Data with Java and the JCL
In this tutorial, we’ll learn how to perform the “Delete” part of the CRUD database operations using the Java Class Library (JCL).
- Deleting a Set of Rows
- Deleting a Specific Row
- Writing a Program to Delete Rows
- Dropping Tables and Databases
Deleting a Set of Rows
To delete a set of rows, use the same mechanism as in Retrieving a Subset of Rows. Then, while iterating through the rows, retrieve each row via the getNext() method and call deleteRow() on the row set with that Row object as the argument:
try {
  while(true) {
    // get subset of rows into rowset
    Row row = rowset.getNext();
    rowset.deleteRow(row);
  }
} catch (PsqlEOFException e) {
  System.out.println("End of deletion.");
}
Deleting a Specific Row
To delete a particular row, start by retrieving that particular row by using the code from the topic Retrieving a Specific Row Using an Index and use the deleteRow() method as above. We’ll write a full program to do this in the next section.
Writing a Program to Delete Rows
Now that we know how to delete rows, let’s write a Java program to remove the course with an ID of PHY203. Save this program as JCLDelete.java:
import pervasive.database.*;

public class JCLDelete {
  public static void main(String[] args) {
    try {
      Session session = Driver.establishSession();
      Database db = session.connectToDatabase("btrv:///zenjcldb");
      Table table = db.getTable("Course");
      RowSet rowset = table.createRowSet();

      // Get the RowSet object’s RowSetMetaData
      RowSetMetaData rsmd = rowset.getRowSetMetaData();

      // Set the access path to access rows by index name
      rsmd.setAccessPath("Course_Code");

      // Get an Index object representing the Course_Code index
      Index index = rowset.createIndex("Course_Code");

      // Set the column name and the value to find
      index.setString("ID", "PHY203");

      // create and configure index
      Row row = rowset.getByIndex(Consts.BTR_EQ, index);
      rowset.deleteRow(row);
    } catch (PsqlOperationException e) {
      if (e.getErrorCode() == 4) {
        System.out.println("Matching row not found.");
      } else {
        e.printStackTrace();
      }
    } catch (PsqlException e) {
      e.printStackTrace();
    }
  }
}
Compile and run JCLDelete.java in a terminal and verify that the row has been deleted successfully by looking in the Zen Control Center or running the JCLRead program.
Dropping Tables and Databases
JCL does not support dropping of tables or databases programmatically. Use Zen Control Center to perform this task. See the Zen Control Center documentation for details.