Accessing Actian Zen with Java and JDBC
In this tutorial, we will learn how to connect to the Actian Zen database using Java and JDBC.
This page covers the topics listed at right.
Java Setup
Make sure you have a recent version of the Java Development Kit (JDK) installed on your system.
Java on Windows
The Java Development Kit is available from the Adopt Open JDK site. To install it, follow the installation instructions on the site. The defaults should work for this tutorial and it will add Java and its libraries to your system.
If everything is installed correctly you should be able to open a command prompt and run the following command:
java -version
The version of Java that you have installed is printed in response. And this command:
javac -version
Should also succeed and report the current version of the Java compiler.
Java on Linux
The Java Development Kit is available from the Adopt Open JDK site. To install it, follow the installation instructions on the site. The defaults should work for this tutorial.
After the download completes, open a prompt. The commands that we enter next will need elevated privileges, so run the following command:
sudo su
You may be asked to enter the root password before continuing.
Next, make a directory to hold the JDK.
mkdir /opt/jdk
The files that we just downloaded are unpackaged in this directory.
tar -zxf ~/Downloads/jdk-12.0.2_linux-x64_bin.tar.gz -C /opt/jdk
To verify that the files were unpackaged, we can look at the files in the directory we made. There should now be a subdirectory for the JDK.
ls /opt/jdk
In this case it shows a single subdirectory named jdk-12.0.2.
To set this as the default Java environment, create symbolic links to the Java Virtual Machine (JVM) and the Java compiler. Run the following two commands to do this:
update-alternatives --install /usr/bin/java java /opt/jdk/jdk-12.0.2/bin/java 100
update-alternatives --install /usr/bin/javac javac /opt/jdk/jdk-12.0.2/bin/javac 100
If you want to make sure that the link worked, you can run the commands to ask for the version of the Java compiler and JVM:
java -version

javac -version
The response should be the version numbers for the runtime.
Leave the elevated privilege session:
exit
This is also necessary for ensuring that file paths properly resolve in the next steps.
You’ll need to set the CLASSPATH environment variable to point to the directory that contains the Java library files and set the JAVA_HOME environment variable to the root JDK directory.
To do this and ensure that it is done every time you log into the computer, set the variable values in your .bash_profile. Open .bash_profile in your preferred editor. For example:
nano ~/.bash_profile
If the file didn’t already exist, then the editor will open a blank document. If the document is not blank, scroll to the end and add the following lines.
# Set the CLASSPATH for Java
export CLASSPATH="/opt/jdk/jdk-12.0.2/lib"
export JAVA_HOME="/opt/jdk/jdk12.0.2"
Update the environment by either running the source command or logging out and back in.
Installing the JDBC Driver
Java Database Connectivity (JDBC) is a Java API that allows an application to interact with different databases in a standard way through a standard API. For the Actian Zen database, a JDBC driver is available. This JDBC driver is a 100% Java certified, type 4 driver.
Read more about the Zen JDBC driver in Introducing the Zen JDBC Driver.
Installing the JDBC Driver on Windows
To install the Actian Zen JDBC driver on Windows, download the JDBC Windows SDK for Actian Zen v14 package. Download this file from the Actian Electronic Software Distribution page. Downloads require an Actian ID, so make sure to log in or register an Actian ID before starting the download.
Select the package to download using the following menu choices.
- Product: Actian Zen (PSQL)
- Release: SDKs
- Platform: JDBC
Expand the JDBC link and scroll to JDBC Windows SDK, then click the HTTP button to download the self-extracting archive.
Note: If a Windows Defender SmartScreen dialog appears, click More info, then Run anyway.
Extract the files in the archive to your local system.
Next, set the CLASSPATH and PATH environment variables to use the Zen JDBC driver. For CLASSPATH, add the Zen JDBC SDK \bin directory to provide access to the following files:
- jpscs.jar
- pvjdbc2.jar
- pvjdbc2x.jar
For the PATH variable, add the full path to pvjdbc2.dll, which is in the \bin directory under the folder where the files were extracted.
Installing the JDBC Driver on Linux
On Linux, the Java components needed for interfacing with Actian Zen are installed with the database. No further installation is required.
The CLASSPATH environment variable must be updated to include the paths to the .jar files. The required files can be found in /usr/local/psql/lib and include:
- jpscs.jar
- pvjdbc2.jar
- pvjdbc2x.jar
In a terminal, open the ~/.bash_profile for the current user account in an editor. For example:
nano ~/.bash_profile
Scroll down to where you made the CLASSPATH entry earlier. The entry must be updated to include the paths to the other .jar files. Update the entry with the following:
export CLASSPATH=$CLASSPATH:<path to pvjdbc2.jar directory>/pvjdbc2.jar
export CLASSPATH=$CLASSPATH:<path to pvjdbc2x.jar directory>/pvjdbc2x.jar
export CLASSPATH=$CLASSPATH:<path to jpscs.jar directory>/jpscs.jar
On Linux, macOS, and Raspbian, the files are installed by default to /usr/local/actianzen/bin/lib.
Update the environment by either running the source command or logging out and logging back in.
For more information see Installing Enterprise Server, Cloud Server, and Zen Client for Linux-based Systems.
Accessing Actian Zen with JDBC
The following topics show how to connect to a Actian Zen database using Java and JDBC commands:
- Creating your own database
- Connecting with a database
- JDBC connection strings
For more information on these topics, see Programming with the Zen JDBC 2 Driver in the Actian Zen documentation.
Creating Your Own Database
To create a database, in Zen Control Center under Engines, right-click Databases and select New > Database.
For this example we call the new database ZENDB and choose its location as C:\actian\databases. For the rest of the options, leave the default settings.
We’ll use this ZENDB database for the rest of this tutorial.
For more information, see Creating a Database in the Actian Zen documentation.
Connecting to a Database
To establish a connection to a database, your code needs to load the Zen JDBC driver at run time by using Class.forName() and the fully qualified class name of the driver, which is com.pervasive.jdbc.v2.Driver as shown in this example code:
public class JDBCConnect {
  public static void main(String[] args) {
    try {
      Class.forName("com.pervasive.jdbc.v2.Driver");
      System.out.println("Driver loaded.");
    } catch (ClassNotFoundException exc) {
      System.err.println("Could not load the driver.");
      exc.printStackTrace();
    }
  }
}
We can compile this code using the command:
javac JDBCConnect.java
And then run the code with this command:
java JDBCConnect
If no exception is returned, the driver was loaded successfully. An exception may indicate the driver is not in the CLASSPATH, so check that variable and try again.
JDBC Connection Strings
To interact with the database through JDBC, you need to build a JDBC connection string. The JDBC connection string contains several items of information about the connection. Some items are required, others are optional. We’ll use only the required ones. For details, see Connection String Overview in the Zen documentation.
The connection string looks like this:
jdbc:pervasive://{server name or IP address}:{port number}/{database name}
where jdbc:pervasive defines the Actian Zen database driver.
For the server name or IP address, since the Zen database is running on your machine, we use localhost.
By default, the network port used for communicating to the Zen database is 1583.
The name of the database is the one defined in Zen Control Center and is lowercase here.
For the ZENDBdatabase that we made earlier, the connection string is:
jdbc:pervasive://localhost:1583/zendb
Now that we have loaded the driver, we can connect to the database.
A connection object is created through the DriverManager.getConnection() method, which takes the connection string, user name, and password. Our database doesn’t have a user name or password, so we use an empty string for both values. Here’s how we get the connection object:
Connection conn = DriverManager.getConnection("jdbc:pervasive://localhost:1583/zendb", "", "");
The full source code to load the driver and connect to our ZENDB database is as follows:
import java.sql.*;
public class JDBCConnect {
  private static final String JDBC_DRIVER = "com.pervasive.jdbc.v2.Driver";
  public static void main(String[] args) {
    try {
      // Load the driver
      Class.forName(JDBC_DRIVER);
      System.out.println("Driver was loaded.");
    } catch (ClassNotFoundException exc) {
      System.err.println("Could not load the driver.");
      exc.printStackTrace();
      System.exit(-1);
    }
    try {
      Connection conn = DriverManager.getConnection("jdbc:pervasive://localhost:1583/zendb", "", "");
      //
      // The commands to interact with the database go here.
      //
      conn.close();
    } catch (SQLException exc) {
      System.err.println("Could not connect to the database.");
      exc.printStackTrace();
    }
  }
}
We can compile this code using:
javac JDBCConnect.java
And then run it with:
java JDBCConnect
For details on the Actian Zen JDBC driver see Programming with the Zen JDBC 2 Driver.
Creating Data with JDBC
In this section, we’ll learn how to execute Create commands with Java and JDBC on an Actian Zen database. We’ll add a table in the ZENDB database, then insert a row into it.
- Creating a Table
- Inserting a Row into a Table
For more details about programming with JDBC, see Programming with the Zen JDBC 2 Driver in the Actian Zen documentation.
Creating a Table
The ZENDB database we created earlier is currently empty. To create a table, we need to execute some SQL using the Statement object that we can get from the Connection object we made earlier:
Connection conn = DriverManager.getConnection("jdbc:pervasive://localhost:1583/zendb", "", "");
Statement statement = conn.createStatement();
Now we can execute this SQL to create the table:
statement.execute("CREATE TABLE Students (Id IDENTITY, Name CHAR(32), Account_Balance INT DEFAULT 0)");
To add the table using CREATE TABLE, we specify:
- Table name: Students
- Set of columns: Id, Name, Account_Balance
- Data type for each column:
- The Id column has the data type IDENTITY, which is an autoincrementing integer value. In other words, its value will automatically be set when a new row is inserted into the table.
- The Name column is CHAR(32), which can store a string up to 32 characters long.
- The Account_Balance column is INT DEFAULT 0. This specifies that only integers are allowed and if you don’t set a value for this column it will be zero.
You can refer to the Data Types documentation to learn more about the types available.
Here’s a complete Java example for creating a table:
import java.sql.*;
public class CreateTable {
  private static final String JDBC_DRIVER =
      "com.pervasive.jdbc.v2.Driver";
  private static final String CONNECTION_STRING =
      "jdbc:pervasive://localhost:1583/zendb";
  public static void main(String[] args) {
    try {
      Class.forName(JDBC_DRIVER);
    } catch (ClassNotFoundException exc) {
      exc.printStackTrace();
      System.exit(-1);
    }
    try {
      Connection conn = DriverManager.getConnection(CONNECTION_STRING, "", "");
      Statement statement = conn.createStatement();
      statement.execute(
          "CREATE TABLE Students (Id IDENTITY, Name CHAR(32), Account_Balance INT DEFAULT 0)");
      System.out.println("Students table created.");
      conn.close();
    } catch (SQLException exc) {
      exc.printStackTrace();
    }
  }
}
Compile this class:
javac CreateTable.java
And then run it:
java CreateTable
Which should return:
Students table created.
In Zen Control Center, press F5 to refresh the view and see the added Students table. Right-click the table name and select Edit to see the three columns specified in creating the table.
Some general rules when creating a database table:
- Tables must have a unique name within a database.
- Columns must have a unique name within each table.
- Each table must have an ID column.
Inserting a Row into a Table
Now that we have created a table, let’s insert some data.
To insert rows in the table, we use the connection object to create a statement object on which we can execute a SQL INSERT statement:
Connection conn = DriverManager.getConnection(CONNECTION_STRING, "", "");
Statement statement = conn.createStatement();
statement.execute("INSERT INTO Students(Name, Account_Balance) VALUES ('John', 100)");
In this statement, we specify the table into which we want to add a row, the columns to include, and the values to store in those columns. We don’t need to specify the Id column because it has the IDENTITY type, which means it will get an autoincrementing value.
After we execute this code, go back to Zen Control Center and press F9 to execute the query in the grid (which is a SELECT statement). This is what we will see in the table:
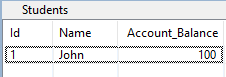
As you can see, the Id is set to 1 automatically as an incrementing value, while Name and Account_Balance have the values that we inserted. Had we left out the Account_Balance, the default value, 0, would have been used.
In the full code example below, we’ll add additional rows so that we have more data to use in the following sections.
import java.sql.*;
public class InsertData {
  private static final String JDBC_DRIVER = "com.pervasive.jdbc.v2.Driver";
  private static final String CONNECTION_STRING = "jdbc:pervasive://localhost:1583/zendb";
  public static void main(String[] args) {
    try {
      Class.forName(JDBC_DRIVER);
    } catch (ClassNotFoundException exc) {
      exc.printStackTrace();
      System.exit(-1);
    }
    try {
      Connection conn = DriverManager.getConnection(CONNECTION_STRING, "", "");
      Statement statement = conn.createStatement();
      statement.execute("INSERT INTO Students(Name, Account_Balance) VALUES ('John', 100)");
      statement.execute("INSERT INTO Students(Name, Account_Balance) VALUES ('Mary', 200)");
      statement.execute("INSERT INTO Students(Name, Account_Balance) VALUES ('Bob', 300)");
      statement.execute("INSERT INTO Students(Name, Account_Balance) VALUES ('Amy', 400)");
      statement.execute("INSERT INTO Students(Name, Account_Balance) VALUES ('Sam', 500)");
      statement.execute("INSERT INTO Students(Name, Account_Balance) VALUES ('Jill', 600)");
      statement.execute("INSERT INTO Students(Name, Account_Balance) VALUES ('Jim', 0)");
      statement.execute("INSERT INTO Students(Name, Account_Balance) VALUES ('Molly', 500)");
      statement.execute("INSERT INTO Students(Name, Account_Balance) VALUES ('Bill', 500)");
      conn.close();
      System.out.println("Data inserted.");
    } catch (SQLException exc) {
      exc.printStackTrace();
    }
  }
}
As we’ve done previously, compile and make sure the program runs successfully.
For more detail and samples see the JDBC API Reference.
Reading Data with JDBC
In this section, we will learn how to perform basic Read query commands with Java and JDBC on an Actian Zen database to do the following things:
- Read all rows in a table with SELECT
- Specify conditions with WHERE
- Sort rows with ORDER BY
- Save query with CREATE VIEW
Reading all Rows in a Table with SELECT
The simplest SELECT example is SELECT *, which returns all rows. Note that SQL commands are not case-sensitive.
Previously, we used the execute() method on the Statement object to create the table and insert data. However, for statements that return data, such as with a SELECT, we need to use the executeQuery() method, which returns a ResultSet object.
The ResultSet object is used to read the rows of values returned. We get each row by calling the next() method on the ResultSet. The next() method returns true if there is more data to read, or false if there is no more data.
Once we have a row, we can read the values of the columns by name or by index. We generally will want to access the columns by name as it’s easier to read. Depending on the column’s data type, we use different methods to get the column’s data. For text, we use getString(). For integers, we use getInt(). Let’s look at an example:
// SQL query to return all rows from the Students table
ResultSet resultSet = statement.executeQuery("SELECT * FROM Students");
while (resultSet.next()) {
  int id = resultSet.getInt("id");
  String name = resultSet.getString("name");
  int accountBalance = resultSet.getInt("Account_Balance");
  System.out.println(
    String.format("%s %s %d", id, name, accountBalance)
  );
}
If we run this code, then the values of the Id, Name, and Account_Balance columns are printed:
1 John 100
2 Mary 200
3 Bob 300
4 Amy 400
5 Sam 500
6 Jill 600
7 Jim 0
8 Molly 500
9 Bill 500
Note that, since we didn’t specify an order for the result (we’ll get to that soon), the returned records may not be in the order shown here.
The SELECT query expects a list of the column names that we want from the table. If we want all of the columns, we can use the * (star) instead. Otherwise, we specify each column name separated by a comma. The following query would have the same result as SELECT *:
ResultSet resultSet = statement.executeQuery("SELECT Id, Name, Account_Balance FROM Students");
Specifying Conditions with WHERE
In a SELECT query, we can add conditions to filter the results. Let’s filter to only see rows where the account balance is above 300. We use the WHERE clause to specify this constraint:
ResultSet resultSet = statement.executeQuery("SELECT * FROM Students WHERE Account_Balance > 300");
If we run the code using the above statement, we see these results:
4 Amy 400
5 Sam 500
6 Jill 600
8 Molly 500
9 Bill 500
We can filter with multiple conditions using AND or OR. The following will return only rows where the account balance is above 300 and less than or equal to 800:
ResultSet resultSet = statement.executeQuery(
  "SELECT * FROM Students WHERE Account_Balance > 300 AND Account_Balance <= 800");
We get the following results:
4 Amy 400
5 Sam 500
6 Jill 600
8 Molly 500
9 Bill 500
For more information see Restriction Clauses.
Sorting Rows with ORDER BY
We can sort the rows by using the ORDER BY clause. The following sorts the results by name, in ascending order.
ResultSet resultSet = statement.executeQuery("SELECT * FROM Students ORDER BY Name");
We get the following results:
4 Amy 400
9 Bill 500
3 Bob 300
6 Jill 600
7 Jim 0
1 John 100
2 Mary 200
8 Molly 500
5 Sam 500
The order could be reversed by using the DESC keyword:
ResultSet resultSet = statement.executeQuery("SELECT * FROM Students ORDER BY Name DESC");
ORDER BY can combined with WHERE to both filter the results and order them.
ResultSet resultSet = statement.executeQuery(
  "SELECT * FROM Students WHERE Account_Balance > 300 ORDER BY Name");
Which would show these results:
4 Amy 400
9 Bill 500
6 Jill 600
8 Molly 500
5 Sam 500
Saving a Query with CREATE VIEW
A view is another mechanism for examining data in your database. It acts like a table, but gets its data from an already existing table and is sometimes called a virtual table. If you have a SELECT statement that is used frequently, it can be saved as a view to make it easier to access.
To create a view, we use the CREATE VIEW statement. In the following, we create a view of the Students table that only shows rows with an account balance less than 200. Note that the view doesn’t have to use all of the columns in the table from which it was made. In this sample we use the Id and Account_Balance columns, but not the Name column.
statement.execute("CREATE VIEW Almost_Empty_Balance (Id, Account_Balance) AS SELECT Id, Account_Balance from Students WHERE Account_Balance < 200");
If we return to Zen Control Center and expand the Views node under ZENDB, the Almost_Empty_Balance view appears.
Open the view to see the IDs of students with an account balance below 200 and the Account_Balance value.
From Java we query the view the same way that we query a table, using the view name instead of the table name:
ResultSet resultSet = statement.executeQuery("SELECT * FROM Almost_Empty_Balance");
while(resultSet.next()) {
  int id = resultSet.getInt("id");
  int accountBalance = resultSet.getInt("Account_Balance");
  System.out.println(
    String.format("%s   %4d", id, accountBalance)
  );
}
And the results would look like this:
1 100
7 0
Updating Data with JDBC
In this section, we will learn how to run commands to modify rows with JDBC. Using the ZENDB database created earlier in this tutorial we will do the following operations:
- Update a table structure by adding a new column
- Update rows by changing values
- Update the default values for a table column
Updating a Table Structure by Adding a Column
Let’s add a new column to the students table. This column will hold data for the student’s major.
The SQL ALTER TABLE statement with the ADD clause is used to add the column. An instance of the Statement class is used to execute our statement. We will add a new column named Major to the Students table and set the default value to “Undecided.”
statement.execute("ALTER TABLE Students ADD Major CHAR(32) DEFAULT 'Undecided'");
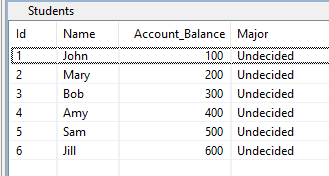
In this command we altered the Students table by adding a column called Major. It takes a character value, and the default, if no other value is specified, will be Undecided.
The result looks like this in Zen Control Center. Note that every row gets the default value for the new column.
We can use the following code, adapted from the Reading Data topic, to query the data with the new column.
// SQL query to return all rows from the Students table
ResultSet resultSet = statement.executeQuery("SELECT * FROM Students");

while (resultSet.next()) {
  int id = resultSet.getInt("id");
  String name = resultSet.getString("name");
  int accountBalance = resultSet.getInt("Account_Balance");
  String major = resultSet.getString("Major");

  System.out.println(
    String.format("%s %s %d" %s, id, name, accountBalance, major)
  );
}
This returns the following, which should match what we see in Zen Control Center:
1 John 100 Undecided
2 Mary 200 Undecided
3 Bob 300 Undecided
4 Amy 400 Undecided
5 Sam 500 Undecided
6 Jill 600 Undecided
7 Jim 0 Undecided
8 Molly 500 Undecided
9 Bill 500 Undecided
Again, note that, without an ORDER BY clause, the result order may differ.
Updating Rows by Changing Values
We can change the values of rows within a table using the UPDATE statement. Usually we will want that update to apply only to specific rows in a table, or only to rows that meet some criteria.
To limit which rows have an UPDATE applied to them, we use the WHERE clause. The clause contains the condition used to decide whether a row is updated.
statement.execute("UPDATE Students SET Major='English' WHERE Major='Undecided'");
In this case, all of the students were undecided, so all were updated.
1 John 100 English
2 Mary 200 English
3 Bob 300 English
4 Amy 400 English
5 Sam 500 English
6 Jill 600 English
7 John Doe 0 English
8 Mary Jane 500 English
9 Bill 500 English
If we wanted to update a single row, the WHERE clause could be updated accordingly.
In this database, let’s say we wanted to update Mary’s major to Computer Science. We could use a WHERE clause that applies the update only to rows with an Id field of 2, since Mary has the only row that matches.
statement.execute("UPDATE Students SET Major='Computer Science' WHERE Id=2");
And we can see that only Mary was updated.
1 John 100 English
2 Mary 200 Computer Science
3 Bob 300 English
4 Amy 400 English
5 Sam 500 English
6 Jill 600 English
7 Jim 0 English
8 Molly 500 English
9 Bill 500 English
Updating the Default Value for a Table Column
When we created the Students table, we specified a default value of 100 for the Account_Balance column. When we added the Major column, we set its default value to Undecided if no other value is supplied.
If we wanted to change the default, we can use an ALTER TABLE statement. The ALTER statement was used earlier to add a column to a table. Here we will use ALTER TABLE … MODIFY to change a property of a column.
statement.execute("ALTER TABLE Students MODIFY Major CHAR(32) DEFAULT 'Math'");
If we insert a new row, we can see the effect of the modification.
statement.execute("INSERT INTO Students (Name, Account_Balance) VALUES ('Sue',700)");
We can see that a row for Sue was created with the new default Math major.
1 John 100 English
2 Mary 200 Computer Science
3 Bob 300 English
4 Amy 400 English
5 Sam 500 English
6 Jill 600 English
7 Jim 0 English
8 Molly 500 English
9 Bill 500 English
10 Sue 700 Math
Stored Procedures with JDBC
We will now look at two advanced SQL features that are supported when you access Actian Zen with JDBC:
- Stored procedures
- SQL triggers
Stored procedures are liked saved SQL statements. If you have a statement that runs frequently with only differences in data, such as inserts into a table, then it is a candidate for a stored procedure.
SQL triggers are a special type of stored procedure that execute automatically when a data modification event occurs.
Use of these features are covered in the following topics:
- Creating a stored procedure to insert new students
- Create a stored procedure that takes parameters
- Create a SQL trigger to increase account balance
Creating a Stored Procedure to Insert New Students
A stored procedure contains statements that we want to execute several times. We can call a stored procedure to execute these statements instead of executing them individually.
We use CREATE PROCEDURE to create a stored procedure. Let’s make a procedure that inserts a single row. Here is the text of the procedure:
CREATE PROCEDURE ADD_Student();
BEGIN
  INSERT INTO Students (Name, Account_Balance) VALUES ('Max',0);
END
The name of the stored procedure, ADD_Student, appears right after CREATE PROCEDURE. This procedure can be created in Zen Control Center by executing it in the SQL editor or alternatively in Java as follows:
statement.execute("CREATE PROCEDURE ADD_Student();\n" +
  "BEGIN\n" +
  "   INSERT INTO Students (Name, Account_Balance) VALUES ('Max',0);\n" +
  "END");
After the statement executes, if you expand the Stored Procedures node for the ZENDB database in Zen Control Center, you will see ADD_Student.
To execute a stored procedure, we use the CALL statement with the name of the stored procedure with no parameters.
statement.execute("CALL ADD_Student()");
Querying the table, we would see a new row inserted using the values specified in the stored procedure and the default value for the Major column.
1 John 100 English
2 Mary 200 Computer Science
3 Bob 300 English
4 Amy 400 English
5 Sam 500 English
6 Jill 600 English
7 Jim 0 English
8 Molly 500 English
9 Bill 500 English
10 Sue 700 Math
11 Max 0 Math
Creating a Stored Procedure that Takes Parameters
The previous stored procedure is extremely limited — it only inserts a Max every time we call Add_Student().
It would be more useful if we could give the procedure the name of the person to add and the account balance. To do that, we can create a stored procedure that takes parameters. With parameters, we can specify the data for the procedure to use at execution time.
We will create a stored procedure that accepts parameters for the Name and Account_Balance columns.
statement.execute("CREATE PROCEDURE ADD_Student2 (in:Name CHAR(32), in :Amount INTEGER);\n" +
"BEGIN\n"+
"     INSERT INTO Students(Name, Account_Balance) VALUES (:Name, :Amount);\n"+
"END");
In this case, the accepted parameters are defined in this portion of the code:
(in:Name CHAR(32), in :Amount INTEGER)
This specifies the name and data types of the two parameters that the procedure accepts. To execute the procedure using the name Fran and an account balance of 500, we could run this statement:
statement.execute("CALL ADD_Student2('Fran', 500)");
Now our rows look like this:
1 John 100 English
2 Mary 200 Computer Science
3 Bob 300 English
4 Amy 400 English
5 Sam 500 English
6 Jill 600 English
7 John Doe 0 English
8 Mary Jane 500 English
9 Bill 500 English
10 Sue 700 Math
11 Max 0 Math
12 Fran 500 Math
Creating a SQL Trigger to Increase Account Balance
SQL Triggers are stored procedures that execute before or after a SQL statement is executed on a specified table. We use a CREATE TRIGGER statement to make a trigger. There are some other new clauses that we need to create a trigger.
statement.execute("CREATE TRIGGER Add_Balance\n"+
  "AFTER INSERT on Students\n"+
   "REFERENCING NEW AS Student\n"+
   "FOR EACH ROW\n"+
   "UPDATE Students SET\n"+
   "Account_Balance = student.Account_Balance + 100\n"+
   "WHERE Id = student.Id;");
After this statement is executed, the Add_Balance trigger appears in Zen Control Center under the Triggers node for the ZENDB database.
In this statement, we create a new trigger named Add_Balance that will execute an update after a row is inserted into the Students tables. The new row is referenced through a variable named student. When a new row is inserted an UPDATE will be triggered to increase the balance by 100. To test the trigger let’s insert a new row.
statement.execute("INSERT INTO Students(Name, Account_Balance) values ('Kim', 800)");
Note that we set the Account_Balance to 800. When querying the rows, we see that the Account_Balance has been increased by 100.
1 John 100 English
2 Mary 200 Computer Science
3 Bob 300 English
4 Amy 400 English
5 Sam 500 English
6 Jill 600 English
7 Jim 0 English
8 Molly 500 English
9 Bill 500 English
10 Sue 700 Math
11 Max 0 Math
12 Fran 500 Math
13 Kim 900 Math
Deleting Data with JDBC
Now we’ll learn how to perform basic delete or drop commands using our ZENDB database and JDBC. We will cover the following topics:
- Delete one row from a table
- Delete multiple rows from a table
- Drop a table
- Delete a database
Note that you cannot restore rows, tables, or databases after using the commands described here. If you want to continue experimenting with Actian Zen after this tutorial using the ZENDB database, do not run the commands to delete the table or database.
Delete One Row from a Table
To delete a specific row from a table, we use the SQL DELETE clause.
If the DELETE clause were executed with no WHERE condition, it would delete all of the rows in a table. By combining DELETE with WHERE, we limit the rows that get deleted. If we know the ID of the row that we want to delete, we can specify to delete only that row.
In our database, the row for Max has an ID of 11. The following would delete the row for Max:
statement.execute("DELETE FROM Students WHERE Id = 11");
And we would see Max is no longer in the table.
1 John 100 English
2 Mary 200 Computer Science
3 Bob 300 English
4 Amy 400 English
5 Sam 500 English
6 Jill 600 English
7 Jim 0 English
8 Molly 500 English
9 Bill 500 English
10 Sue 700 Math
11 Fran 500 Math
12 Kim 800 Math
Delete Multiple Rows from a Table
To delete multiple rows, we can specify a WHERE clause with a condition that covers more than one statement. For example, several of the rows have English for a major. We could delete all of the English majors.
statement.execute("DELETE FROM Students WHERE Major='English'");
1 Mary 200 Computer Science
2 Sue 700 Math
3 Fran 500 Math
4 Kim 800 Math
If we remove the WHERE clause, then all of the rows in the table are deleted.
Drop a Table
Dropping a table deletes the entire table from the database, including any rows in it.
To drop a table, we use the SQL DROP TABLE statement.
statement.execute("DROP TABLE Students");
Before executing this statement, if we look in Zen Control Center we see the Students table present.
After executing the statement, if we return to Zen Control Center we can refresh the window by right-clicking the ZENDB database and selecting Refresh.
In the refreshed view, the Students table no longer appears.
Delete a Database
If you want to delete an entire database, you need to do so within Zen Control Center. It’s not something that you can do using the JDBC driver.