Accessing Actian Zen with ODBC
In this tutorial, we will learn how to connect to the Actian Zen database using ODBC commands. This page covers the topics listed at right.
Connecting with a Database
Actian Zen is a relational database management system. An Actian Zen instance can have multiple databases. Each database contains tables. Tables contain records that represent individual entries in the database. A table also has a schema or structure that includes the data type for each column in a record.
An Actian Zen installation includes a preconfigured example database called Demodata. To view it, open Zen Control Center. In the left navigation window, expand the nodes Zen > Engines > Server > Databases > DEMODATA > Tables to see the database contents.

Zen Control Center enables you to view and edit records in the tables, run queries, monitor performance, manage licensing, and much more.
For the rest of this tutorial, we’ll use ODBC to access the database programmatically. This enables you to write to and query the database interactively through a terminal or command prompt, by writing scripts, or by including calls to the database in your application.
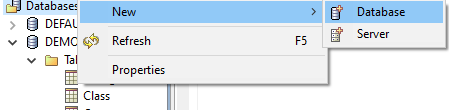
Creating Your Own Database
To create our own database for use in this tutorial, in Zen Control Center right-click the Databases icon and select New > Database.
In this example we’ll create a new database called ZENDB. The following dialog lets you select a database name, location, and settings. We’ll use ZENDB for the other Zen tutorials.
Note: We do not recommend creating a database in a \bin directory. It is best practice to create a database in its own directory in a data storage location. For example, create a new folder called ZenDB under C:\ProgramData\Actian\Zen. Then create the tutorial database in the location C:\ProgramData\Actian\Zen\ZenDB.
After you enter the name and location, accept the default settings for the rest of the options and click Finish.

For more information, see Creating a Database in the Zen documentation.
ODBC Connection String (Python)
To interact with databases via ODBC, we must first import the pyodbc module in a script or interactive session:
import pyodbc
This is assumed for all other examples in the guide, so we won’t repeat this line for every example.
To connect with the database, we need to pass a driver-specific connection string to Actian Zen through the pyodbc.connect command.
conn_str = "Driver={Pervasive ODBC Interface};Server=Localhost;DBQ=ZENDB"
db = pyodbc.connect(conn_str)
The connection string specifies the following:
- Driver is the ODBC driver to use for the connection. The available driver names can be found in the Actian Zen documentation under Zen ODBC Driver Names.
- Server is the location of the computer to which we’re connecting. In this case LocalHost references an instance on the local system.
- DBQ is the internal name of the database we’re connecting to. In this example we’re using the ZENDB database created earlier.
Other supported connection string options are explained in the documentation under ODBC Driver Parameter.
Creating a Cursor
To interact with the database you need to create a Cursor:
c = db.cursor()
With the cursor, you can now execute any SQL Create, Read, Update, Delete (CRUD) commands. This tutorial will cover more about them later.