Reading Data with ODBC
In this tutorial, we’ll learn how to perform basic query commands using ODBC. These cover the Read part of the CRUD database operations.
Using the connection string and ZENDB database created in the previous tutorial, we’ll proceed with the topics listed at right.
Read All Records in a Table with SELECT
A simple example is to select all data from a table with a SQL SELECT statement:
c.execute("SELECT * FROM Students")
The SELECT clause allows you to read data from a table. The asterisk is a wildcard to query all columns for each row. You can also choose to name only specific columns that you care about.
After you execute the command, you can access the data using the cursor API from pyodbc.
for row in c.fetchall():
print(row)
Here is what you should see:
(1, 'John                            ', 100)
(2, 'Mary                            ', 200)
(3, 'Bob                              ', 300)
(4, 'Amy                             ', 400)
(5, 'Sam                             ', 500)
(6, 'Jill                               ', 600)
Each row is a record and includes all columns defined for the table:
- Id, which is incremented for each new record
- Name, which is 32 characters long, including spaces
- Account_Balance, with the value we provided
Specify Conditions with WHERE
In the SELECT query, you can add specific conditions that can help filter your results from your table.
c.execute("SELECT * FROM Students WHERE Account_Balance > 300")
for row in c.fetchall():
print(row)
The WHERE clause allows you to create conditions for the query to follow when looking for records. In this case, you’re displaying all records that have an Account_Balance value greater than 300:
(4, 'Amy                             ', 400)
(5, 'Sam                             ', 500)
(6, 'Jill                               ', 600)
More information:
Sort Records with ORDER BY
Along with the WHERE Clause, you can also use the ORDER BY clause to sort the data returned by a SELECT query.
c.execute("SELECT * FROM Students ORDER BY Name")
for row in c.fetchall():
print(row)
In the results, your records will be shown ordered alphabetically by student name. Here’s what it looks like:
(4, 'Amy                             ', 400)
(3, 'Bob                              ', 300)
(6, 'Jill                               ', 600)
(1, 'John                             ', 100)
(2, 'Mary                            ', 200)
(5, 'Sam                             ', 500)
More information:
Save a Query with CREATE VIEW
A view is another mechanism for examining data in your database. A view is a virtual table created from the results of a SQL statement.
Another way to think about it is that you’re saving a named SELECT clause that you can come back to later by using the name of the view.
To create a view we use the CREATE VIEW statement:
c.execute("CREATE VIEW Almost_Empty_Balance(Id, Account_Balance) AS SELECT Id, Account_Balance from Students WHERE Account_Balance < 200")
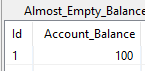
This creates a view called Almost_Empty_Balance that will display all students that have an account balance of less than 200.
If you look under Views in Zen Control Center, you’ll see a new view called Almost_Empty_Balance with all the students that have an Account_Balance less than 200:
Reading the view in Python is the same as reading records from a table:
c.execute("SELECT * FROM Almost_Empty_Balance")
for row in c.fetchall():
print(row)
This returns one record, and only the Id and Account_Balance columns specified in the original CREATE VIEW statement:
(1, 100)
More information: