Creating Data with ODBC
In this tutorial, we’ll learn how to execute create commands with ODBC on an Actian Zen database. We’ll create a table in the ZENDB database, then insert a record into the table.
This page covers the topics listed at right.
Creating a Table
We have our own ZENDB database now. For the rest of the tutorial, we’ll be playing around with this database.
Currently, the ZENDB database is empty. In this step we create a table.
First, connect to ZENDB using the connection string explained in a previous step:
conn_str = "Driver={Pervasive ODBC Interface};Server=Localhost;DBQ=ZENDB"
db = pyodbc.connect(conn_str)
Create the cursor:
c = db.cursor()
Now use the cursor’s execute method and the SQL CREATE TABLE command to create the table:
c.execute("CREATE TABLE Students (Id IDENTITY, Name CHAR(32), Account_Balance INT DEFAULT 0)")
The execute method basically passes a SQL statement to the database. In this case the SQL statement is:
CREATE TABLE Students (Id IDENTITY, Name CHAR(32), Account_Balance INT DEFAULT 0)
To create a table, you need to specify:
- The table name (Students)
- A list of columns (Id, Name, Account_Balance)
- The corresponding data type for each column
In this example:
- The Id column has the data type IDENTITY, an auto-incrementing integer value that you don’t need to set every time you add a new entry.
- The Name column has the data type CHAR(32) and stores a string that can be 32 characters long.
- The Account Balance column has the data type INT DEFAULT 0, which specifies that Account_Balance is a whole number (INT), but if you don’t set a value, the default value for this column will be 0.
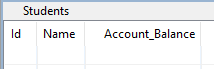
Go back to Zen Control Center and, if needed, press the F5 key to refresh, to see the new Students table.

Double-click the table to automatically run SELECT * and display the results. Looking at the column information, we see the 3 columns we specified in the CREATE TABLE statement:
See Zen Supported Data Types in the documentation to learn more about the available data types.
Some general rules when creating your database:
- Databases must have a unique name.
- Tables must have unique names inside the same database.
- Columns must have unique names inside each table.
- While tables do not require a column ID field, we use one in this tutorial to demonstrate its use and behavior.
Inserting a Record into a Table
Now that we have created a table, it’s time to insert a record into it.
We use the cursor execute method again, this time to pass a SQL INSERT command to add a record:
c.execute("INSERT INTO Students(Name, Account_Balance) VALUES ('John', 100)")
c.commit()
This is a basic SQL INSERT operation. We specify the table we want to add a record into, the columns we want to include, and then the specific values we want to store in those columns.
In this instance, the Id column will autoincrement because it has an IDENTITY data type.
After inserting a record, we need to commit the change, or else the record will remain temporary data and not be added to the database.
After we have executed the commands, go back into Zen Control Center, open the table, and press F9 to execute the SELECT * query again.
Here’s what we see in the Students table:
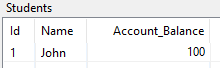
As you can see the Id is automatically set to 1 as an incrementing value, while Name and Account_Balance have the values as we set them. Note that if we had decided to omit setting an Account_Balance, the default value of zero would have been used.
We won’t go back to Zen Control Center in future tutorials to verify every step, but now you’ve seen how to perform those basic functions if you want to double-check your work.
Now let’s add a few additional records so that we have interesting data to use in the following tutorials:
c.execute("INSERT INTO Students(Name, Account_Balance) VALUES ('Mary', 200)")
c.execute("INSERT INTO Students(Name, Account_Balance) VALUES ('Bob', 300)")
c.execute("INSERT INTO Students(Name, Account_Balance) VALUES ('Amy', 400)")
c.execute("INSERT INTO Students(Name, Account_Balance) VALUES ('Sam', 500)")
c.execute("INSERT INTO Students(Name, Account_Balance) VALUES ('Jill', 600)")
c.commit()
These commands insert five more records into the table, then commits the changes. We should have six records all together now.
Committing Changes and Autocommit
Note that we can also set an autocommit option in the connection string.
db = pyodbc.connect(conn_str, autocommit=True)
When autocommit is true, any changes are automatically committed when you run use the execute() method. You won’t need to use the commit() method (c.commit() in the examples above).
For the rest of the tutorial, we won’t include the c.commit() command in the examples.
More information: